I am swapping out my Oil Pressure sending unit on the ( '78 ) 350 sbc engine, the sending unit location is just to the right of the Distributer on drivers side..and wondering if anyone on here has ever changed that unit, and installed a short extension to the brass fitting in the block, ( I have the tube disconected off the top of that fitting ).. that the nut with the tubing attaches to. Is there a manufactured extension available,..or what type extension does one install,if it is at all feasable ?? It's a real PIA trying to get that brass fitting out of the block,.as anyone who has changed one probably knows.
I think its 1/8 NPT. I used a 6in pipe nipple as an extention. I put a 1/8 tee on top with my dash gage off the top and a 1/8 plug on the side. Now I can check my dash gage with my bench gage using the plug port.
Hey Wayne,,,(I'm not too sure what you are trying to accomplish)but Steve is right it is 1/8" NPT but if it was me I wouldn't put a long nipple in there. 1/8" pipe isn't very strong and the threads are real fine and shallow. If the nipple is long there is more stress on the threads. If it cracks or breaks off you will know it by the loud knocking noise..
TMJ
It is 1/8" NPT and they did what you are asking from the factory on some cars. You can get the fittings from Canadian tire. You should use the shortest pipe you can. The factory one is about 1" long.
What I am doing is replacing my Oil Pressure Guage which was fed by a copper tube running from the sending unit in the block to the guage. The new guage has a rigid plastic hose that came with the unit. I left the original fitting / sending unit, in the block,..and just removed the extreme top fitting / ( 1/4" Nut ), that the copper line went into with the ferrule on the end. What I have left in the block is the old sending unit itself,..which has a 1/4" male end coming out of it,..and it is this 1/4" male end that I would like to add an extension to. As TMJ said,..it shouldn't be too long for obvious reasons,..and I was thinking maybe an inch,.. to an inch and a half extension,..but that extension would have to be 1/8th Dia. inside, to get a true reading on the guage, would it not ??
What I am doing is replacing my Oil Pressure Guage which was fed by a copper tube running from the sending unit in the block to the guage. The new guage has a rigid plastic hose that came with the unit.
I built an engine run stand so I could start engines in my garage. The idea was to locate and deal with any obvious issues with a running engine before installing the engine in a vehicle. One time I started an engine (SBC) without the fitting in the block for the oil pressure gauge (the one beside the distributor). HOLY CRAP ..... the ceiling, and a lot of other stuff was blasted with oil. It was crazy how much oil came out of that tiny little hole, in a matter of a second or two. In my case, the engine oil was cold as the engine had just been started.
Why am I mentioning this? Well, I have heard several people recommend using copper tube, rather than the plastic line because copper is FAR less likely to rupture, wear through, get pinched etc. I personally can't imagine driving down the highway (at speed) and having the plastic line fail, anywhere inside the interior of the car, and potentially be coated with extremely hot oil.
Have I ever run the plastic line? Yes. Have I ever had a problem with it? No. That being said, I completely understand why copper line is recommended over those cheap plastic line kits. You might be wise to either retain the copper line or replace the copper line with copper, rather than use the plastic stuff your gauge came with.
I haven't discarded the copper tube yet either paap,... I too have some mixed feelings about plastic tubing,..and especially on something as crucial as engine oil. I have lots of that tubing on hand here so will probably make up a new line out of my stock. That was quite the experience that you had,...LMAO.
the plastic tube is less likely to break than the copper will from vibration, and plastic is less likely to pinch off like copper will
my race truck has one plastic line on it and two copper - I have had both copper lines break - the saving grace - they were not oil lines
Interesting ... good to have an opinion based on real life experience.
As I mentioned, I have run the plastic line and have not had any issues. I don't have any experience with the copper line, just repeating what I had been told by people who saw that I was running the plastic stuff. Maybe the only actual issue with plastic line is the fact that it can melt if it contacts an exhaust manifold or some other very hot component or maybe get brittle with age after being exposed to many hot/cold cycles.
This is interesting .... according to the NHRA rules, oil pressure line must be metal or steel braided.
1.10 OIL SYSTEM
Accu-sump, dry-sump tanks, oil filters, oil supply lines, etc., prohibited in driver compartment and outside of frame and/or steel body / fenders. Oil pressure gauge and line permitted in driver compartment. Metal or steel braided line mandatory, maximum 3/16-inch (4.76 mm) inside diameter. Power enhancing additives prohibited.
-- Edited by pint and a pound on Thursday 29th of January 2015 01:31:43 PM
I used a 6in pipe nipple on mine because its such a difficult spot to get at. I also use a plastic line to the gage and havnt had any trouble with either yet. I can see how a copper line may break with enough vibration .
@ 427 Carl,...I'll say ( very good responses ),...this is where Forums,..and the members are invaluable. There is alway's someone who has " been there,..done that ",...and I can't thank you guy's enough for taking the time to forward your input,..and explaining your past experiences in regards to this issue.
I used a 6in" pipe nipple on mine because its such a difficult spot to get at. I also use a plastic line to the gage and havnt had any trouble with either yet. I can see how a copper line may break with enough vibration .
__________________
Steve,...when you say "Pipe Nipple",..is that the same type pipe nipple a plumber would use in a house,..or is it brass,..??
1/8 standard pipe schedule 40.... working pressure 3500psi burst 20,200... Od. .405 wall..068 Id .269 . As long as the nipple isn't slapping the firewall or fender when the motor mounts load it shouldn't break . The nipple will vibrate at the same level as the engine . The flex line acts as a buffer between the engine and the body the same way a rubber motor mount acts as long as its supported at both ends and not rubbing on something the more flexible it is the better .
Wayne not sure if you have it finished yet or not but if you can install a new copper line make it a little longer and wrap it around a small tube or dowel and put a couple of coils in it to take up any of the vibration between the motor and the body. And I have installed a 45 deg elbow in the block and then put the fitting with the seat into it and attach the copper line. Has always worked god for me.
Wayne not sure if you have it finished yet or not but if you can install a new copper line make it a little longer and wrap it around a small tube or dowel and put a couple of coils in it to take up any of the vibration between the motor and the body. And I have installed a 45 deg elbow in the block and then put the fitting with the seat into it and attach the copper line. Has always worked god for me.
I have it all back together now,..and for sure, I did go the " 3 coil " route in the copper line between engine and firewall. I didn't have,..and couldn't seem to manufacture a socket or wrench to get the old sending unit out of the block,..so I just used the old unit. I am removing the complete hood off the car here shortly,..plus the nose piece of the front sheet metal in order to install a new aluminum radiator,...while I have all those components out of the way,..I will take another stab at removing the oil sending unit,..and install a extension at that time. Thank You for your input,..appreciated !!
I installed an electeic sending unit on mine and I used brass fittings and tube all NPT. I got everything at DeTag, they had a great selection way better than CTC. It took some patience to ge the right configuration.
I installed an electeic sending unit on mine and I used brass fittings and tube all NPT. I got everything at DeTag, they had a great selection way better than CTC. It took some patience to ge the right configuration.
Thanks el toro,...I took the copper line off the sending unit at the intake,...( don't seem to have a tool to remove the sending unit,..even after grinding down sockets ),...so I cut the tubing at the nut fitting,..removed the old ferrule and nut,...re-opened the end of the tubing to correct dia. after cutting,...and installed a new fitting and ferrule back onto the old sending unit. In the meantime perhaps I can come up with a tool to remove the old sending unit.
Wayne,
I'll look tomorrow for the size of the socket I have that is specifically for removing and installing a sending unit. I've had it since I was a kid.
Wayne, I'll look tomorrow for the size of the socket I have that is specifically for removing and installing a sending unit. I've had it since I was a kid.
That would be a great help just knowing the size Wayne,...I ground down a couple sockets, ( pretty thin sided ) to no avail. Appreciate it if you can let me know the size.
Wayne, I'll look tomorrow for the size of the socket I have that is specifically for removing and installing a sending unit. I've had it since I was a kid.
cheyenne wrote:
That would be a great help just knowing the size Wayne,...I ground down a couple sockets, ( pretty thin sided ) to no avail. Appreciate it if you can let me know the size.
What have I been doing wrong that has allowed me to never have had a problem removing any SBC oil pressure fittings (electrical or mechanical)? I don't have any special sockets or tools specifically for the task. Not making fun, just confused that there is a problem. Any chance someone can take a pic of the required socket and maybe explain what makes it different over a standard short (or long) socket?
What have I been doing wrong that has allowed me to never have had a problem removing any SBC oil pressure fittings (electrical or mechanical)? I don't have any special sockets or tools specifically for the task. Not making fun, just confused that there is a problem. Any chance someone can take a pic of the required socket and maybe explain what makes it different over a standard short (or long) socket ?
It's the location,...snug up against the side of the intake manifold ( Weiand ) ,..and there is no standard socket that I know of that's going down over top of that sending unit on my engine !!
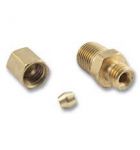
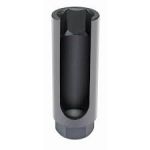
Is this the fitting you are having an issue with? If that IS it, is there no way to get an open end wrench on it? If it is right up against the intake, I can't see a socket working unless you remove a 1/3 or so of the side of the socket (by grinding), similar to what is used for O2 sensors (picture is an O2 socket).
-- Edited by pint and a pound on Friday 27th of February 2015 12:04:10 PM
That is what I am having the problem with exactly. I have a couple sockets that I have ground down,..but they seem to be still too large diameter to get down in between the sending unit and the intake. An open end wrench is out of the question on this puppy. Somewhere around here I have a number of boxed end wrenches that I have ground down pretty fine for working on areas inside aircraft wings,...if I could locate them, I may find one that would go down over the unit far enough to get some leverage on the damn thing to remove it.
Wayne,
the socket I have is a Snap-on S-970, 1 inch 12 point socket 3/8ths drive, thin wall . It is open in the centre for the bakelite portion to slide into and not be broken. I know it's at least 40 years old. I know that snap-on still carries it.Can you get a set of w/p (slip joint) on it from the top?
Wayne, the socket I have is a Snap-on S-970, 1 inch 12 point socket 3/8ths drive, thin wall . It is open in the centre for the bakelite portion to slide into and not be broken. I know it's at least 40 years old. I know that snap-on still carries it.Can you get a set of w/p (slip joint) on it from the top?
No room for slip joints either Rochie,...the damned intake has a real high point on it, right at that spot, and the distributor is right there nice and handy too. I think I am just going to leave the unit as is for now, ( it worked ),..I just thought I would install a new one while swapping out the guage. Appreciate the help Bud !!
"Thinning down" the socket isn't going to work if there is literally no room between the fitting and the intake for a socket, thinned down or otherwise. Find yourself a 12 point socket, remove (not just thin down) a good portion of the side of the socket ... if that doesn't do it ... remove a bit more. You will then have to loosen the fitting as much as the socket will turn (till it hits the intake), then raise the socket and place it back on the fitting in preparation for another partial turn, repeat, repeat. Take a look at the O2 socket I pictured, it isn't thinned down, a large chunk is actually missing.
All you have to lose here is a cheap 12pt socket.
Even removing a full half of the socket may allow you to remove the fitting. You would simply be basically converting a socket into an open end wrench. If you need to remove that much though, it might be best to start with a 6 point socket.
The socket or wrench you need is 7/16" to remove the fitting that is still in the block.
I just dug through my fittings stash and found an oil pressure fitting ... the socket or wrench you need is 7/16" to remove the fitting that is still in the block.
-- Edited by pint and a pound on Friday 27th of February 2015 02:03:31 PM
That is what I have ground down now is a 7/16" socket,...if I continue trying to get it out,..I will take a section out of the one side of the socket as you suggested. I think I will try and find a 7/16" socket with the hex end on it ( if they make one ) that I can get an open end wrench onto,..not much room for a ratchet under that distributor,..( not even the slim little 1/4" drive snap-on ratchet ),...I was trying to use the 1/4" drive with a universal joint on it,..to no avail.
1/4" drive or 3/8" drive shouldn't matter either way ... what I don't like is the universal swivel joint ... you need to be able to put sideways pressure on the socket to keep it from slipping off. A swivel won't allow you to do that.
I understand that you are fine with leaving it as is ... but, if you really want that fitting replaced with an extension, just remove the dist and "git 'er done". You can remove quite a large part of the socket and still have it usable, like I said, remove enough so it functions the same as an open end wrench.
Best of luck
I don't know that I've ever seen a socket with a hex on the end, other than the usual ones for spark plugs. If you have access to a welder, you could just weld a nut or even a bolt to the end of the socket.
-- Edited by pint and a pound on Friday 27th of February 2015 02:25:27 PM
Yep,...I have a Mig right here at the shop,...I will give that a shot !! Thanks for your input,..greatly appreciated !!