I've never used a bead roller but I can't imagine trying to crank the handle while attempting to guide the material at the same time. Having a second set of hands around isn't always possible as well. Powering a bead roller must be the only way to go. I absolutely LOVE how you set yours up. Fantastic. If I ever get a bead roller, I'm doing this for sure (as I have several flex plates and starters laying around).
Awesome! I've seen this mod a few years ago on the HAMB, but it was one pic and no play by play explanation. While most of it seems pretty straight forward, could you further explain about the variable speed switch install into the foot pedal switch?...and maybe a few detailed pics?
Thanks for taking the time to show us how it's done Chris!
__________________
"If I could get back all the money I've ever spent on cars...I'd spend it ALL on cars !!!
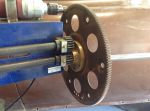
I pick up a VS drill last trip to Harbor Freight for just that reason. Was going to go chain and sprocket but the ring/starter gear looks like a far better idea. Thanks for the great solution.
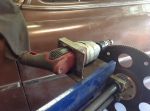
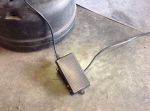
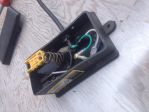
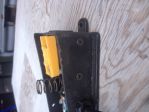
Steve,as for the variable speed switch, I suggest instead of messing up the drill like I did to achieve the job that you purchase a variable speed pedal to start with, had I known I could have, I wouldn't have messed around either, time is money,money that could have been spent to buy the right bits,lol.. I took the drill apart,separated the forward /reverse switch from the trigger switch and bolted it back in to the handle assembly. The tail of the drill handle was chopped off,more so to shorten the length of things up,not necessary but I want to hide the ugliness under a set of shields that ironically could not make until the bead roller was functional. Sat and figured out what wires would have to be tied together to make the drill run at a constant wide open when plugged in, this would be optimal voltage at full pedal then!next,removed the single bolt that pivots the pedal assembly ,clipped the live lead on the original switch (on/off) ,hard wired the two trigger switch wires from the drill handle together and pressed the trigger to see if we had contact when the hard wired drill was plugged in to the pedal assembly and eureka ,had a fipunctioning drill then. Next was a few minutes hoggin out the innards of the lower peddle assembly enough to fit the trigger switch in its new home. I will take photos Monday night or Tuesday when I am back home and have time to "open 'ER up) to photograph!
But as I say, be smarter than me and buy the right component at first then simply plug the drill in ,lock the trigger to wide open and instantly start using it, when the $29 "high quality" drill gives up the ghost, simply buy another and bolt in in place...
__________________
Buying selling and trading garage toys and big kid stuff.
Great post Chris and timely too. I picked up a bead roller from HF when I was in Syracuse a couple of weeks ago. I opened it up yesterday to try it out and immediately wanted to power it, hand cranking sucks. This will help me immensely!
Steve,as for the variable speed switch, I suggest instead of messing up the drill like I did to achieve the job that you purchase a variable speed pedal to start with, had I known I could have, I wouldn't have messed around either, time is money,money that could have been spent to buy the right bits,lol.. I took the drill apart,separated the forward /reverse switch from the trigger switch and bolted it back in to the handle assembly. The tail of the drill handle was chopped off,more so to shorten the length of things up,not necessary but I want to hide the ugliness under a set of shields that ironically could not make until the bead roller was functional. Sat and figured out what wires would have to be tied together to make the drill run at a constant wide open when plugged in, this would be optimal voltage at full pedal then!next,removed the single bolt that pivots the pedal assembly ,clipped the live lead on the original switch (on/off) ,hard wired the two trigger switch wires from the drill handle together and pressed the trigger to see if we had contact when the hard wired drill was plugged in to the pedal assembly and eureka ,had a fipunctioning drill then. Next was a few minutes hoggin out the innards of the lower peddle assembly enough to fit the trigger switch in its new home. I will take photos Monday night or Tuesday when I am back home and have time to "open 'ER up) to photograph! But as I say, be smarter than me and buy the right component at first then simply plug the drill in ,lock the trigger to wide open and instantly start using it, when the $29 "high quality" drill gives up the ghost, simply buy another and bolt in in place...
Don't take the pedal apart for photos on my account Chris - I'll just get the variable pedal like you said. I might use my big Makita gear reduction drill to reduce the speed a little more - I should be able to just crawl with that set up!
__________________
"If I could get back all the money I've ever spent on cars...I'd spend it ALL on cars !!!
Steve,as I say,with the reduction I have,it is only at a 16 feet per minute speed wide open,I too can crawl,you may have an advantage if trying to roll out heavier material! Hope it works out for you too,yeah,best suggestion on the foot pedal, buy it,lol..
__________________
Buying selling and trading garage toys and big kid stuff.
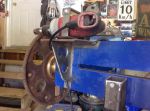
So nice to have the option of the fly when using both hands to steady or steer a piece ... If you have to let go to adjust speeds ,defeats the purpose sort of. Very nice to slow down to a crawl on a tiget corner and then wide open in the straights!
-- Edited by Chris Stapley on Tuesday 4th of August 2015 11:37:18 AM
__________________
Buying selling and trading garage toys and big kid stuff.
So nice to have the option of the fly when using both hands to steady or steer a piece ... If you have to let go to adjust speeds ,defeats the purpose sort of. Very nice to slow down to a crawl on a tiget corner and then wide open in the straights!
-- Edited by Chris Stapley on Tuesday 4th of August 2015 11:37:18 AM
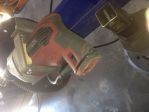
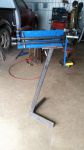
Awesome Chris, Love the vid. I bought the PA model, Not a bad buy but it needs stiffening. I welded some beefy ass bracing onto it and a stand to get it to about chest height. Ill get some pics when I get a minute,
Thanks for posting
__________________
If at first you don't succeed, GET A BIGGER HAMMER!
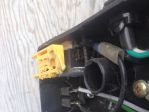
Steve, I took the bolt out of the pedal today to attempt taking photos of the variable speed switch from the drill handle as cobbled in to the pedal assembly, ip unless you know what you're looking at this may just confuse,lol.. It was ugly but functional..mother yellow portion is the remainder of the trigger that would have protruded out of the drill handle, pared down on the belt sander to the right height to work properly.. Oh ,and of coarse because I used the iPad,the photos are all turned sideways,sorry man...
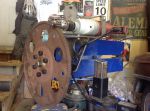
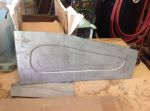
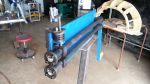
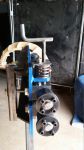
I see the piece of 1" tubing appears to be a guide for straight line running g,clever idea BamBam,but what is the spring in the upper roll? I cannot see its purpose as a compression style spring yet,?
__________________
Buying selling and trading garage toys and big kid stuff.
I see the piece of 1" tubing appears to be a guide for straight line running g,clever idea BamBam,but what is the spring in the upper roll? I cannot see its purpose as a compression style spring yet,?
Good eye, the spring has the rod with the handle that runs thru and is the applied pressure to the dies. I've added a second rod that is threaded into a nut welded onto the upper roller guide. the spring raises the upper die as you unwind the handle. (1 rod push down, the other pulls up). the 1"tube will evolve into a straight guide but Primarily it makes the machine riged as a virgin on his wedding night. I locks the upper and lower dies in alignment and removes virtually all deflection in the mainframe. A little crude but you work with what you got,,,
Ive seen guy's add springs that pull-up an the upper guide, but I thought if I could keep the spring above the support bracket for the tension rod it would not interfere with an irregular shaped work-piece.
under load.
P.S. - I saw an old truck with G Stapely on the door at the jalopy jamup, relative?
Doug, I think any industrial supply house should sell a variable speed ( foot potentiometer) maybe Aklands Garinger etc,, EBay is where I have seen them affordable (well,sort of) otherwise,it's just a bit of drinking around to do what I did and it works awesome!
__________________
Buying selling and trading garage toys and big kid stuff.
Thanks buddy, I see why you've reinforced your unit,it appears in this picture to be made of about half the material that the Eastwoods units are! The old truck may have been a relative of ours somewhere along the line,it also has an interesting story in that it was stored in a barn not two blocks from where I grew up, an old friend in town had bought it when he was young,proceeded to hot rod it in the late fifties with a Buick Nailhead motor with his brother,it got as far as the motor being set in place and the co barn door was sealed shut,at least he though it had been sealed shut until the day he sold his property..you see,his son, a year younger than myself,knowing I was a hot rodder told me about this cool truck in his dad's bar that he wanted to show me. this went on for years until one weekend they went away,we had to dig sod out of the doorway in order to make then swing,we opened it up and to my surprise had my name on the side,lol... We carefully replaced the sod and until about a year ago his father knew nothing of it,lol!
__________________
Buying selling and trading garage toys and big kid stuff.