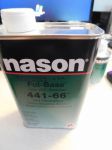
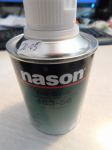
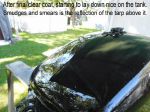
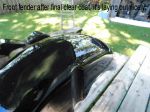
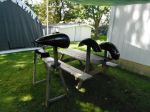
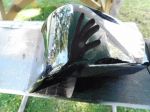
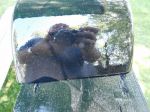
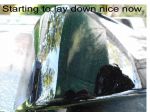
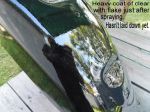
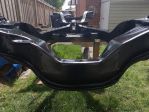
I'm always messing around trying and/or looking for less expensive, or easier ways of doing things. Sometimes you get lucky, and a lot of the time...not. Automotive paint is getting right out of this world for expense. So looking for a bit of a monetary break isn't that far out there. This little gimmick won't replace automotive paint in all instances, but it has its place. Tremclad is a brand familiar to most people, and Rust Coat is the sister brand (Home Hardware brand) are both made by the same company. Lots of stuff gets painted with either or and most jobs come out with about a 70% gloss factor. After reading about decent results using Tremclad with acrylic base medium reducer and acrylic hardner it was decided by my nephew and myself to give it a shot. The chosen victim is his Honda Shadow bike. Front and rear fender, tank and both side covers, 5 pieces in all. And just to add a bit of intrigue, he wanted silver metal flake also. Not a problem, if your going to fail at something.....go big or go home. The parts were repaired and prepped as needed and readied for the big day. Silver metal flake was found at the local dollar store, three small viles for a $1.50 Yep, top of the line premo stuff, picked the one with small enough flake size to go through the gun. (They call it "glitter", your kids likely have some in their art and craft supplies.) The gun....A Harbour Freight $9.99 USD one at that, with a 1.4mm fluid tip. Princess Auto sells the same gun for $39.99 CAN but it comes with an air regulator. Woo-hoo! So with our Nason brand medium reducer and Nason brand hardner, 1lt of black Tremclad and 1lt clear Tremclad, 1 small vile of metal flake (glitter) we were in business. Here's the results in pictures, and yes this really is the true results. How will it weather and wear? Haven't a clue, it's a wait and see at this stage. It may turn out great, it may blister and fall off, I have no idea. But right now it looks fabulous with a deep shine like glass. My camera couldn't decide to focus on the reflection or the metal flake. When I sprayed it, I went a bit light with a pebbly coat and let it flow out on it's own. 2 light coats of black with reducer and hardner letting it sit for 20 min at least between coats to tack, then with just the residue of the black in the mixing bucket, I added the clear and flake with the reducer and hardner, mixed it up and shot the slightly black tinted mix. I gave it a medium coat (heavy enough to let the flake lay down) and let it sit and tack up for at least another 20 minutes. This time it looked to have a lot of orange peel, but it did lay down nicely. (Ok...was worried there for a bit.) Final coat was just a shot of clear with the reducer and hardner. And then it was left alone to do it's own thing. Other than a couple of uninvited bugs, it came out looking pretty good. It does take longer to set up than automotive paint, but I'm thinking that's likely why it retains the gloss it does. (Paint that sets up fast, cools the surface and condenses the moisture in the air making it 'blush' and leaves a foggy looking finish.) At any rate, that's what we did, and that was the results. Paint your roundy round race car, wheelbarrow, hot rod, little brother or what ever you want. Take care.
Jeeze, that looks really good Sniper. I've used Vara-thane and it's held the gloss for years but no-where near that nice. Thanks for posting what you used and how as well, that really helps an amateur like myself.