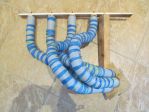
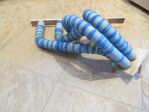
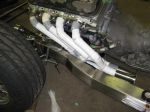
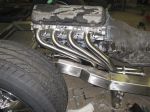
Members Login
Username 
 
Password 
    Remember Me  
Post Info TOPIC: equal length fender headers design


PETERBOROUGH, ONT

Status: Offline
Posts: 922
Date:
equal length fender headers design
Permalink  


My first attempt at making equadistant headers:


First I used a metal flange as a template to mark on a strip of wood where the cylinders 


are.


Then I used a whole saw bit to cut 8 round chunks out of a thick piece of plywood.


Then I bolted four of them to the center of the cylinder marks on the strip of wood.


Next I joined a 2 x 2 to the small strip of wood, allowing for the distance from my 


number 8 cykinder to the firewall and the distance out from the motor for the frame and 


steering.


Then I made a small plywood ‘collector’ from another piece of plywood and glued the 


other four round chunks to the ‘collector’. I now had two stable points to work between.


Then I bought two 10’ x 1 1/2” electrical conduit pipes because the outside diameter 


matches the headers I have.


Next, I drew a line on the conduit from end to end. That became my centerline.


Using that line, I cut the conduit into 1” pieces, some straight and some cut at a 15 


degree angle on one end. This gave me a 3” radius.


Then I drilled both ends twice, back and front, with a very small bit.


Then, starting with number 5 cylinder, I connected each piece by bending a small piece 


of 12 gauge metal wire into a staple shape and placing them in the holes.  4 staples/piece


Since number 5 cylinder travels farthest, I ran it as straight as possible to the collector, preset at what I determined to be a good angle.


With number 5 cylinder in place, I knew the rest had to hold the same amount of pieces. ( Some straight pieces are 2" or 3")


F6A0015A-20FF-480C-9F78-0ECDF21BE105.jpegF6A0015A-20FF-480C-9F78-0ECDF21BE105.jpeg


(Oops, too many photos - sorry)

Initially I covered them with green tape but it wasn’t enough to take the strain so I


used rubber bands to hold the wire ‘staples’ in place.


Number 5 cylinder took 23 pieces when made as short as it could be between the ‘flange’ 


and ‘collector’.  I then knew that the other cylinders had to match 23 pieces.


I don’t know if this is a ridiculous or brilliant idea but I was just curious to see if I 


could create equal length headers and I have the time so why not try ?


Now I can disconnect the long segments and place them on steel mandrels, draw the angles and cut accordingly.


I guess I have to learn to Tig weld now - but I've been watching videos so maybe I'll try that too.


The total cost was about $12 for the conduit & $5 for the wire.  The wood was scrap.  This should save me wasting metal later.


39912382-B012-4D67-A4E7-E833D6108008.jpeg

F6A0015A-20FF-480C-9F78-0ECDF21BE105.jpeg


-- Edited by Cuddles on Wednesday 2nd of February 2022 07:03:54 AM

Attachments
__________________


PRINCE EDWARD COUNTY, ONT

Status: Offline
Posts: 1282
Date:
Permalink  
 

If you have the time and inclination, more power to you. These kits can cost anywhere from $600 to $2400 and only do the same thing. Excellent thinking and workmanship.
www.summitracing.com/parts/evt-2000ehsystem
Warren

__________________
You can only make it better


PETERBOROUGH, ONT

Status: Offline
Posts: 922
Date:
Permalink  
 

Thank you so much Warren.

__________________


PERTH, ONT

Status: Offline
Posts: 88
Date:
Permalink  


     Nice job,not a fun thing to make. On the equal length ,not so important anymore

acording to David Vizard ,some engines actually make more power with unequal length pipes.


      Keep up the good work.        


                     Buzzard


__________________


NORTH BAY, ONT

Status: Offline
Posts: 391
Date:
Permalink  
 

Now you need to watch an episode or two of "Bad chad customs" to perfect your technique of tube bending to get a proper fit....
If you have never seen the show... it may be something worth while watching..... caution viewer discretion strongly recommended....

__________________

The best way to get on your feet is to get off your ass.


PETERBOROUGH, ONT

Status: Offline
Posts: 922
Date:
Permalink  
 

Thank you. I will check out Bad Chad online (we only have 1 tv channel) but if I cut these right, I don't think I'll need to bend any tubes. But I will watch and learn. I like to learn. And I will check out David Vizard too but I did the fender header design just to see if I could. The bonus is that they are equal length as planned. I had never done anything like this before and I am anxious to follow it through to completion. I learned the English wheel and I am learning welding. Maybe I can Tig weld someday. Thanks everybody. So much support.

__________________


NORTH BAY, ONT

Status: Offline
Posts: 391
Date:
Permalink  
 

Really... pick and choose what you're about to see.... there is a reason they call him Bad Chad... I can't remember the episode that he was bending exhaust tubing but it is something ......

__________________

The best way to get on your feet is to get off your ass.

77


BARRIE, ONTARIO

Status: Offline
Posts: 1395
Date:
Permalink  
 

Ummmmmm .... Dont get mad at me ok . I see the effort of what your doing but about the turn of the last century I designed a set of hedders using kinda the same wooden jig idea . But I had gone to a local appliance guy repair I knew and with permission raided his scrap bins and got about ten sections of flexible vaccuum cleaner hoses and just bent them to my pleasure , But when it came time to fab the tubes I filled the tubes w plaster to make them hard so I could copy them

__________________

I,m as cool as Milner , but axeually a bit more like Beckwith


MARKHAM, ONT

Status: Offline
Posts: 1344
Date:
Permalink  
 

Another method.........


IMG_2425 (Medium).jpg


IMG_2465 (Medium).jpg


Attachments
__________________
PUGSY


PETERBOROUGH, ONT

Status: Offline
Posts: 922
Date:
Permalink  
 

You see! Once again I took the stupid or hardest way. I thought there would be a simpler way. Still, I'm glad I did it the way I did. I still like it. Nice to know the other options though. Thanks guys.

__________________


MARKHAM, ONT

Status: Offline
Posts: 1344
Date:
Permalink  
 

Cuddles wrote:

You see! Once again I took the stupid or hardest way. I thought there would be a simpler way. Still, I'm glad I did it the way I did. I still like it. Nice to know the other options though. Thanks guys.


 No, not stupid at all.

I just posted to have a bunch of different methods in one thread in case anyone is looking.

Guys are now using your method a lot these days. They like the look of all them welds.


__________________
PUGSY


PETERBOROUGH, ONT

Status: Offline
Posts: 922
Date:
Permalink  
 

Thank you 123pugsy but if I do it right, I should only have about 4 seams/pipe, depending on which pipe of course. But thanks. It took quite a while from start to this point but I enjoy it. I am fabricating the tack welding clamps next. Doesn't look too hard. Just takes time & the money I save I can spend on other stuff I can't make.

__________________


ONTARIO

Status: Offline
Posts: 1454
Date:
Permalink  
 

Cuddles nothing is " stupid or hardest" if you're doing it your way. You looked at project, rummaged some ideas around then went at it. Doesn't matter if other people approve of your methods, you did it and learned a few things along the way. As you can see from member posts you're not the only one to tackle the problem - and there are a number of ways to get there. They all work and at the end of the day you had the satisfaction of another job well done in your own garage. Keep going.

__________________
77


BARRIE, ONTARIO

Status: Offline
Posts: 1395
Date:
Permalink  
 

Experimentin and havin fun is all part of hot roddin

__________________

I,m as cool as Milner , but axeually a bit more like Beckwith


PETERBOROUGH, ONT

Status: Offline
Posts: 922
Date:
Permalink  
 

I have to admit that I was so surprised when I started my first task of making a floor for my 'A' which, at the time, was just a roller. The videos I found from places like Eastwood said to make cardboard templates and it has been a blast ever since. Some things are scary and some things are easy but it's meeting nice people and learning on the way. The destination might be rewarding but it's the journey that is such a treat. Thanks to all here for the progress I make. I hope to make you proud of what you taught me.

__________________


PERTH, ONT

Status: Offline
Posts: 88
Date:
Permalink  
 

Here is a set I just finished on my Comet,pretty tight.


          BuzzardDSCF2361.JPGDSCF2362.JPG


Attachments
__________________


MARKHAM, ONT

Status: Offline
Posts: 1344
Date:
Permalink  
 

They be tight alright. Good stuff.

__________________
PUGSY
Page 1 of 1  sorted by
 
Quick Reply

Please log in to post quick replies.


Create your own FREE Forum
Report Abuse
Powered by ActiveBoard