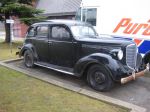
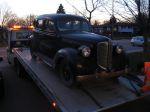
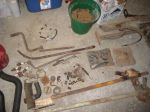
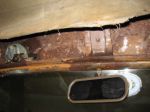
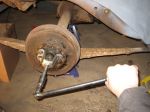
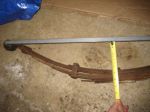
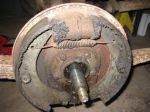
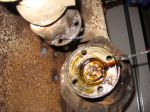
Members Login
Username 
 
Password 
    Remember Me  
Post Info TOPIC: 1938 Dodge D8 4d sedan project


MISSISSAUGA, ONT

Status: Offline
Posts: 132
Date:
1938 Dodge D8 4d sedan project
Permalink  


Hi,

I bought the 1938 Dodge D8 4d sedan in April 2013 like I wrote in my introduction.I decided to show you guys what I have done so far and write a bit of story how it has went. Also a memo for myself for later reference. The plan is to add here something once in a while if there is any progress or when I face any problems and need advice.

All these pics and much more pics are in my Flickr Dodge set below but I'll add the key pics along the story:

http://www.flickr.com/photos/112609786@N07/

Feel free to comment, give ideas which direction to go, ask for stop writing, I don't promise any of that affects at all, but feel free to do so

Thanks,
Hannu


1938 Dodge D8 4d sedan project - the story

April, 2013

Decided to check out this Dodge, and I bought it a week later.

IMG_1600.jpg

It's not been driven in 50 years but all the parts are there. The engine was suppose to be running a year earlier, at least it has fresh oil and new spark plugs.

Pretty exciting when it finally arrived. First few days went by checking what exactly I got. Original lug nut tools, bumper jacks, snow chains for tires and even spare spark plugs, nice!

IMG_1631.JPG

IMG_1705.JPG

No real plans yet what to do with it. Most likely I keep it fairly original and try to get it up and running.

Bought one more hub cap from a fellow in Hamilton, I have full set now, met him in Ancaster swap and got some 1938 Ontario license plates from him (not available to register). Also got a tail light lense from him, then I realized the driver side tail light bucket is wrong style.


Attachments
__________________

Hannu, 1938 Dodge D8 4d sedan

http://www.flickr.com/photos/112609786@N07/sets/72157639061490723/


MISSISSAUGA, ONT

Status: Offline
Posts: 132
Date:
Permalink  
 

May - October, 2013

First few weeks I just removed the wheels and started to disassemble the interior to see in what kind of shape the car really was.

And a bit more rust than I expected. But the frame seemed to be really solid which was a big bonus. Only 3 dead mice were found. The interior smelled quite bad.

More work with the interior disassemble and also trying to remove the doors. Rust goes all the way to the door hinges and window pillars so work is getting quite slow.

IMG_1751.JPG

IMG_1759.jpg

IMG_1781.JPG

IMG_1811.JPG

The sheet metal work is starting. First one is the rear passenger side fender. The inner fender is really rusty and the real fender is welded to the body and the whole side is warped a bit. So I cut it open.

IMG_1853.JPG

IMG_1854.JPG

Should have replaced more sheet metal but maybe next time. I bought a cheap flux mig welder and it works but end result is not pretty. Well, not sure if welding rusty sheet metal produces a nice weld anyhow. Won't be a show car and will be better than it was a while ago.

IMG_1872.jpg

IMG_1885.jpg

Some areas are quite tricky since both sides are pretty much gone and no pictures found what it should look like. I just did what I thought it should have been.

IMG_2000.jpg

IMG_2003.jpg

IMG_2075.jpg

My metal working tools are quite basic.

IMG_2066.jpg

IMG_2068.jpg

Bought my first new parts, the body bushings and new hardware. Better replace those now when it's still easy. Got also a new wiring set and decided to convert to 12V system.

IMG_2079.JPG

Had to put some color on the new pieces since they started to have some surface rust. Used just some self etching primer for now. Looks much better already.

IMG_2115.JPG

IMG_2116.JPG

IMG_2117.JPG

IMG_2118.JPG

Decided to remove the front piece as well, it was easiest to remove the whole thing as a package, quite heavy. The radiator alone is like 50 lbs.

IMG_2122.JPG

Found from Ancaster second swap I went a set of Plymouth -37 tail light buckets and they are really close to original so I will use those. Got also some vacuum wiper motors but not sure yet if I replace with electric ones since I decided to move to 12V system anayways.


Attachments
__________________

Hannu, 1938 Dodge D8 4d sedan

http://www.flickr.com/photos/112609786@N07/sets/72157639061490723/


MISSISSAUGA, ONT

Status: Offline
Posts: 132
Date:
Permalink  
 

November - December, 2013

Not much was done Nov - Dec. I had to make some room to garage for my second car so welding is on hold until the weather gets to plus figures.

Started to tear down the steering system and the front suspension, and the front brakes. Nice change to all the rusty sheet metal and welding/grinding work. What a interesting piece of design the whole front suspensions and steering.

Brake drums were stucked but then read the service manual a bit more and found out the major brake shoe setting, after that got them out.

First real problem, one of the bolts broke when removing the front axle. That bolt attaches the sway eliminator bracket to the front axle. The bolt broke so that not sure I can weld anything to that, or should I drill it and try bolt extractor screws or what. On hold now.

IMG_2306.JPG

IMG_2313.JPG

IMG_2321.JPG

IMG_2331.JPG

IMG_2332.JPG

IMG_2341.JPG


Attachments
__________________

Hannu, 1938 Dodge D8 4d sedan

http://www.flickr.com/photos/112609786@N07/sets/72157639061490723/


MISSISSAUGA, ONT

Status: Offline
Posts: 132
Date:
Permalink  
 

January, 2014

New year and more energy.

I had read some horror stories about removing the rear brake drums and the hubs. I was thinking about buing the OTC 7394 hub puller, but then went to the parts store and they loaned me a hub puller, not really heavy duty but what the heck, I can try it.

It was so easy, 20 min and both sides were out, I didn't need a hammer or even an extension to my short breaker bar. Lucky huh!

I removed the drive shaft and started to tear down the rear brakes. Everything was well lubed from the rear end oil so was quite easy to remove the brake parts. I really need to replace all rear end seals.

Started to think about new springs front and back, all the leafs are tired and some critical ones are broken. In the front the issue is that the springs are quite different to each other. One side is shorter and the other has more leafs. Got some reference measurements from a guy in US. Interesting spring shackle system, never seen before. Waiting for some info from a Canadian reseller for Eaton Detroit Springs if they know the original specs. Hoping to get the car a bit lower.

That was the last one for a while, I promise
IMG_2367.JPG

IMG_2370.JPG

IMG_2381.JPG

IMG_2385.JPG

IMG_2389.JPG

IMG_2396.JPG

IMG_2402.JPG


Attachments
__________________

Hannu, 1938 Dodge D8 4d sedan

http://www.flickr.com/photos/112609786@N07/sets/72157639061490723/


TRENTON, ONT

Status: Offline
Posts: 448
Date:
Permalink  
 

Looks like your off to a good start! Them springs must weigh a far bit too!

__________________

Growing old is inevitable, growing up is an option!! 


MISSISSAUGA, ONT

Status: Offline
Posts: 132
Date:
Permalink  
 

Thanks Ziggy!

Yes, once I get the rear springs out I'm quite happy. Everything is pretty heavy, rusty but real steel...


__________________

Hannu, 1938 Dodge D8 4d sedan

http://www.flickr.com/photos/112609786@N07/sets/72157639061490723/


MISSISSAUGA, ONT

Status: Offline
Posts: 132
Date:
Permalink  
 

January, 2014 (cont.)

Managed to remove the rear end and the rear leaf springs from the car during the weekend. Sounds simple but it really was a lot of work because everything was so rusty and stuck.

Most of the problems I had were with the rear spring shackles which were stuck pretty solid in the frame brackets. After few days of heat treatment with my small propane torch and some WD-40 rust penetrate I finally got them moving with a sledge hammer, and got them finally out as well.

And pretty happy that I didn't cause any more damage to the frame brackets which can be saved. Only the leaf spring plates are usable from the rear suspension parts removed, everything else is pretty much gone. Well, perhaps also the shock mounts can be used unless I find the new/better ones.

IMG_2424.JPG

IMG_2433.JPG


Attachments
__________________

Hannu, 1938 Dodge D8 4d sedan

http://www.flickr.com/photos/112609786@N07/sets/72157639061490723/


NORTH BAY, ONT

Status: Offline
Posts: 3717
Date:
Permalink  
 

Great bunch of pics Hannu, thanks for posting the update.

__________________


MISSISSAUGA, ONT

Status: Offline
Posts: 132
Date:
Permalink  
 

Thanks for your comments Sasquatch.

I was just so happy to finally "complete" the disassembly, well some engine/transmission mounts are left and the engine itself is a different story but all the suspension/steering/brakes are on the floor now, and the body and frame are detached as well.

__________________

Hannu, 1938 Dodge D8 4d sedan

http://www.flickr.com/photos/112609786@N07/sets/72157639061490723/


SOUTH RIVER, ONT

Status: Offline
Posts: 1771
Date:
Permalink  
 

Love the pics Hannu.
Keep em coming.....and have fun.

Janice

__________________

Janice


MISSISSAUGA, ONT

Status: Offline
Posts: 132
Date:
Permalink  
 

Thanks Janice, much appreciated.

__________________

Hannu, 1938 Dodge D8 4d sedan

http://www.flickr.com/photos/112609786@N07/sets/72157639061490723/


BRANT COUNTY, ONT

Status: Offline
Posts: 1155
Date:
Permalink  
 

nice work!

__________________

slab----67 chevy II 2dr post and 66 chevy II hardtop

plus the kids 87 Camaro and 68 SS Camaro


MISSISSAUGA, ONT

Status: Offline
Posts: 132
Date:
Permalink  
 

Thanks slab

__________________

Hannu, 1938 Dodge D8 4d sedan

http://www.flickr.com/photos/112609786@N07/sets/72157639061490723/


ONTARIO

Status: Offline
Posts: 4606
Date:
Permalink  
 

Good build with lots of pictures !! Keep em coming.

__________________


MISSISSAUGA, ONT

Status: Offline
Posts: 132
Date:
Permalink  
 

Thanks Hemi43, will do

__________________

Hannu, 1938 Dodge D8 4d sedan

http://www.flickr.com/photos/112609786@N07/sets/72157639061490723/


MISSISSAUGA, ONT

Status: Offline
Posts: 132
Date:
Permalink  
 

January, 2014 (cont.)

A bit cold in the garage so not much has been done.

IMG_2496.JPG

However, I did manage to tear down the sway eliminator assembly.

Any ideas how to remove that broken bolt?? I tried to weld a nut to that but doesn't stick good enough with my welder.

IMG_2439.JPGIMG_2441.JPGIMG_2445.JPGIMG_2447.JPGIMG_2492.JPG

Here is a picture with the bench seats back in the car.

Not sure what to do with the colors inside the car, most likely dark gray and at least not this original brown.

IMG_2451.JPG

Removed the seat rails and emptied the bottom section.

IMG_2474.JPGIMG_2489.JPG

Well, never seen a king pin setup before so I had to take a closer look...

IMG_2497.JPGIMG_2498.JPG

Is there any company / anyone in Mississauga who could install the new king pins and hone / ream the new bushings?


Attachments
__________________

Hannu, 1938 Dodge D8 4d sedan

http://www.flickr.com/photos/112609786@N07/sets/72157639061490723/


NORTH BAY, ONT

Status: Offline
Posts: 3717
Date:
Permalink  
 

Did you get the broken bolt out?

They can be an interesting challenge at times. I'd try heating the housing, not red hot,,just good and warm, then keep soaking it in penetrating oil, (Not WD-40, that is a waste of effort,) and get a left hand drill bit, be sure to have the drill started dead center of the bolt, then go up in size, (say from 1/4 to 1/2 then to a size close to the OD of the bolt.
Take your'e time, do not rush this, (you don't want a broken off drill bit in the broken off bolt!)
Often the left hand drill bit will begin backing the bolt out as the torque biting into the bolt as it cuts, along with creating a bit more heat from drilling will break the rust around the threads.
Don't know if this is a through bolt or is it bottomed out in a blind hole?
If it is a through bolt, usually you can just drill it right through, and get very close to the OD of the bolt threads, then often the remaining thread slivers can be picked out by a sharp pick, and patience. Then re-tap the hole cleaning up the threads.
Patience is the key in these extractions.

__________________


ST MARYS, ONTARIO

Status: Offline
Posts: 1415
Date:
Permalink  
 

Thanks for the posts, yes looks pretty cold in your shop, This is the coldest winter I can remember for about 25 years..but not long now and the sun will shinning it's Vitamin "C" all over us...You might consider checking out a couple vans to get some decent comfortable modern seats that will fit right into that car and be way much more comfy..I am sure any machine shop can install ,ream and fit those pins.. with that abour press you have you could them yourself and just get them reamed if they need to be..


__________________


ST MARYS, ONTARIO

Status: Offline
Posts: 1415
Date:
Permalink  
 

On another note readind rays post..best penatrating oil I ever used is good old Coke-a-cola..soak that sucker in coke for a couple day and you be able to turn that sucker with an easy out..and mabe a little heat with-out damaging the threads..


__________________


MISSISSAUGA, ONT

Status: Offline
Posts: 132
Date:
Permalink  
 

Thanks guys for the ideas!

The bolt is still there. I normally use WD-40 rust penetrate and for everything else it's been working quite nicely, and much better than the normal WD-40. I can try Coke as well, I have also used CLR for some bolts but seems to help only if some small surface rust.

I have a small propane torch and been warming that piece (and myself) now for few weeks. I tried to drill a hole to the bolt but my drill bits only scratch the surface, I got some new cobalt drill bits yesterday so let's see if I get something going. It's a blind hole so a bit more tricky. It has also a UNF fine thread and would like to save that.

I usually have patience but let's see what happens with this one.

About the king pins, I may try to change those myself and was looking for a hand reamer in the ebay the other day. Actually the king pins were quite good even now, just a bit of extra movement. The bearing was bad in both sides but that comes in a new king pin replacement kit. Just thinking is it a must to change the bushings if the new king pin can be reamed to the old bushing fine?


__________________

Hannu, 1938 Dodge D8 4d sedan

http://www.flickr.com/photos/112609786@N07/sets/72157639061490723/


MISSISSAUGA, ONT

Status: Offline
Posts: 132
Date:
Permalink  
 

Oh, and about the seats. I was thinking about the modern seats but not sure yet. It would be cheaper to buy good condition leather seats (front and back) from a newer car than replace the upholstery on the current bench seats. The current beach seat cushions and frames are in good shape now, and would only need new seat covers. And, I kind of like the original look, but let's see.

__________________

Hannu, 1938 Dodge D8 4d sedan

http://www.flickr.com/photos/112609786@N07/sets/72157639061490723/


MISSISSAUGA, ONT

Status: Offline
Posts: 1040
Date:
Permalink  
 

Hey Hannu

                     Where in Mississauga are you located? I am at cawthra and lakeshore ,I can give you a hand with those king pins

also have oxy and acyl if you want to heat up your broken bolt  will send you a pm


__________________

 If you cant move it with a hammer

It must be an electrical problem


ONTARIO

Status: Offline
Posts: 4606
Date:
Permalink  
 

dodge38 wrote:

Just thinking is it a must to change the bushings if the new king pin can be reamed to the old bushing fine?


 It's not the pin that gets honed, its the bushings. You wont find the proper diameter reamer, because more than likely the ID of the bushing will be an odd size. I reamed a set of bushing for one of the members here using an adjustable reamer, but it was a PITA because the reamer was too short. Honing seems to be the best procedure.


__________________


MISSISSAUGA, ONT

Status: Offline
Posts: 132
Date:
Permalink  
 

Joe, that sounds great, thanks for the help offer !!

I'm only like 5 min from you, at Cawthra and Bloor St corner.


__________________

Hannu, 1938 Dodge D8 4d sedan

http://www.flickr.com/photos/112609786@N07/sets/72157639061490723/


MISSISSAUGA, ONT

Status: Offline
Posts: 132
Date:
Permalink  
 

Dan, yes that's what I tried to say also but wrote then something else... thanks for the clarification.

I think this should be the correct reamer for my case:
www.ebay.com/itm/Dodge-Plymouth-Mopar-1934-1956-King-Pin-51-64-Reamer-/290606091377

And, I have also read that honing would be better and longer lasting method.

__________________

Hannu, 1938 Dodge D8 4d sedan

http://www.flickr.com/photos/112609786@N07/sets/72157639061490723/


ONTARIO

Status: Offline
Posts: 4606
Date:
Permalink  
 

Cool looking reamer. It's obviously made for that purpose so it's gotta work. IMO I would still get it honed by a machine shop. By the time you get that reamer to your door, it will have cost you more than what the machine shop would charge, and more than likely you'll never use that reamer again.

__________________


MISSISSAUGA, ONT

Status: Offline
Posts: 132
Date:
Permalink  
 

I agree... however, might need the reamer for a Dodge 38 truck and/or a coupe later in the futur, but only if I finish this car first (says my wife)...

__________________

Hannu, 1938 Dodge D8 4d sedan

http://www.flickr.com/photos/112609786@N07/sets/72157639061490723/


MISSISSAUGA, ONT

Status: Offline
Posts: 1040
Date:
Permalink  
 

Hey Hannu

               check this ad number on kijiji  554427173 

or type in 1938 dodge and look for front end   joe mac


__________________

 If you cant move it with a hammer

It must be an electrical problem


COBOURG, ONT

Status: Offline
Posts: 2145
Date:
Permalink  
 

why are dodges so bass ackwards?  I put a set of pins and bushings in the rat truck and they pressed in and fit the pins perfect  I think any pin kit you would buy today would be pre fit, no machining needed


__________________


MISSISSAUGA, ONT

Status: Offline
Posts: 132
Date:
Permalink  
 

Joe, great meeting you today, and big thanks again for your help! I still can't believe you managed to remove the bolts and saved the thread as well!

That Kijiji add I have seen before but have ignored that for some reason. Thanks for reminding about it. Need to ask for the price and if the springs are any good.

Fatstax, you may be right and it could be easy like that. I'll get the new king pins and bushings and we'll check with Joe if any reaming is needed.


__________________

Hannu, 1938 Dodge D8 4d sedan

http://www.flickr.com/photos/112609786@N07/sets/72157639061490723/


MISSISSAUGA, ONT

Status: Offline
Posts: 1040
Date:
Permalink  
 

Nice to meet you as well Hannu, only to glad to be able to help out and get you moving 

forward on your project again. The front end would be a hard sell I think ,also 3 hour drive to fetch it.

 talk again soon joe mac 


__________________

 If you cant move it with a hammer

It must be an electrical problem


TORONTO, ONT

Status: Offline
Posts: 196
Date:
Permalink  
 

dodge38 wrote:

Dan, yes that's what I tried to say also but wrote then something else... thanks for the clarification.

I think this should be the correct reamer for my case:
www.ebay.com/itm/Dodge-Plymouth-Mopar-1934-1956-King-Pin-51-64-Reamer-/290606091377

And, I have also read that honing would be better and longer lasting method.


 If you're not in too much of a rush, I could probably hone the bushings in 2 or 3 weeks from now.


__________________

What's the point of writing a response if its only going to get deleted.


MISSISSAUGA, ONT

Status: Offline
Posts: 132
Date:
Permalink  
 

Bruce, I'm not is a hurry, I still need to order the new King pins.

I'll PM you if it looks like the bushings need honing, thanks for the offer!


__________________

Hannu, 1938 Dodge D8 4d sedan

http://www.flickr.com/photos/112609786@N07/sets/72157639061490723/


ANCASTER, ONT

Status: Offline
Posts: 1304
Date:
Permalink  
 

I just bought and fitted a new kingpin set myself. Got the kit from speedway, very reasonable price, and I have a US address in Niagara, so postage is cheap too. I looked for a reaming tool in Canadian tire, but no luck there. A friend did it on his big machine at a reasonable rate, and is much better as you really want both ends honed at the same time to make sure the kingpin sits straight.

Good luck with the broken bolt. Can't advise on anything more than has been said, it's my least favourite problem to solve, lol.


-- Edited by Dave Scott on Monday 27th of January 2014 01:24:31 PM

__________________

If you're stuck, I have a truck ;-)


MISSISSAUGA, ONT

Status: Offline
Posts: 132
Date:
Permalink  
 

Thanks Dave, no problems with the bolts anymore, Joe removed the bolt pieces from the front axle and sway eliminator yesterday!

The king pins I'll order from Andy Bernbaum, Dodge size not available from all the shops but the price is not that bad. If the fit is not good then I decide if we use an adjustable reamer, I buy an Dodge size reamer, or honing.

__________________

Hannu, 1938 Dodge D8 4d sedan

http://www.flickr.com/photos/112609786@N07/sets/72157639061490723/


MISSISSAUGA, ONT

Status: Offline
Posts: 132
Date:
Permalink  
 

It's been a while since the last update, too cold in my garage... but I'm really fortunate to be able use Joe's garage for some of the work, been mainly cleaning and painting some of the suspension pieces.

IMG_2540.JPGIMG_2541.JPG

IMG_2553.JPG

I bought a "new" front axle and springs from the Kijiji ad Joe mentioned earlier. I got half decent set of leaf springs and a disk brake setup.

IMG_2545.JPGIMG_2552.JPG

That actually partly solved my king pin problems. Seems like Canadian Dodge models use needle bearings instead of the bushings in the upper spindle hole for the kingpin, and the bearing ID is 51/61" which no-one makes anymore. In the new front end I bought there is home-made bushings which are in good condition so I'll use those and the new kingpins I got.

Also finally I spent a little bit time with the engine. Removed the manifolds and the valve covers. Looks a bit dirty inside the engine so need to take it apart and clean it at least. Good thing is that the engine turns easily.

IMG_2565.JPGIMG_2566.JPG

IMG_2568.JPGIMG_2569.JPG

IMG_2570.JPGIMG_2575.JPG


Attachments
__________________

Hannu, 1938 Dodge D8 4d sedan

http://www.flickr.com/photos/112609786@N07/sets/72157639061490723/


DUNDAS, ONT

Status: Offline
Posts: 1961
Date:
Permalink  
 

Looks great . cant believe i have missed this thread until now. as far as the king pin bushings go any precision ground shafting or chrome shafting normally comes 1/2 a thou under size so the reamer would be on size. Just checked my NOS ford 32-34 king pin set and the pin measures .8117 left and right so a 13/16 ream would finish it with .0004 wall clearance. checked my 57 chev king pin set and the pin measures .8655 so the proper 22 mm ream will finish it with.0003 wall clearance. I can't see Dodge being any different.... The pressed in bushing should be fine as long as you can get grease to the pin .What did the new axle come off ?  nice score if its the same track width R&P would make steering a lot easier.


__________________
What a long strange trip its been


MISSISSAUGA, ONT

Status: Offline
Posts: 132
Date:
Permalink  
 

Thanks Slim!

The new axle came from a Dodge 38 coupe so it's the same axle even. But I wasn't planning to use the R&P piece yet, I want to feel the original steering first, perhaps later

But I'll use the disk brake setup and the modified spindles, they had the bronze bushings with the grease grooves/holes already so that's fine and the new kingpins have proper clearance so I'm fine now.

I have yet to identify what the disks/spindles/calibers are from, 5 x 4.5" bolt pattern is all I know now.

Also managed to combine all the leafs I have now for a decent set of front springs.


__________________

Hannu, 1938 Dodge D8 4d sedan

http://www.flickr.com/photos/112609786@N07/sets/72157639061490723/


LINDSAY, ONT

Status: Offline
Posts: 54
Date:
Permalink  
 

excellent work
nice to see another 4 door project
kinda helps motivate me a little more

thanks for the updates

__________________


MISSISSAUGA, ONT

Status: Offline
Posts: 132
Date:
Permalink  
 

Thanks Derek! Yeah, I'm happy that I'm not the only one building a 4 door car smile

I took the disk brakes apart and seems like they are from a late B/E body Mopar like 1974 Dodge Charger. Both the disks and the calipers seem to be okay, just need to replace the pads and seals etc.

IMG_2588.JPGIMG_2591.JPG

IMG_2593.JPGIMG_2594.JPG


Attachments
__________________

Hannu, 1938 Dodge D8 4d sedan

http://www.flickr.com/photos/112609786@N07/sets/72157639061490723/


DUNDAS, ONT

Status: Offline
Posts: 1961
Date:
Permalink  
 

I think this is what you have

Your Price:$29.95
Core Price:$5.00
Quantity:
Add to Cart


Vehicle: 1975 PLYMOUTH ROADRUNNER V8-318ci 5.2L 2 BBL Vin G

otes: Front ; Right ; Installation Hardware Incld ; w/Metal Piston ; w/Pin;Type Caliper ; 1 Per Veh; Years:1975-1978


-- Edited by slim on Sunday 23rd of March 2014 09:53:22 AM

__________________
What a long strange trip its been


DUNDAS, ONT

Status: Offline
Posts: 1961
Date:
Permalink  


ModleEngineTypeYear
CHRYSLERCORDOBAAllDisc Brake Caliper - FRONT LEFT76-75
DODGECHARGERAllDisc Brake Caliper - FRONT LEFT78-73
DODGECORONETAllDisc Brake Caliper - FRONT LEFT76-73
DODGEMONACOAllDisc Brake Caliper - FRONT LEFT78-77
PLYMOUTHFURYAllDisc Brake Caliper - FRONT LEFT78-74
PLYMOUTHFURY IAllDisc Brake Caliper - FRONT LEFT1974
PLYMOUTHFURY IIAllDisc Brake Caliper - FRONT LEFT1974
PLYMOUTHFURY IIIAllDisc Brake Caliper - FRONT LEFT1974
PLYMOUTHROADRUNNERAllDisc Brake Caliper - FRONT LEFT75-73
PLYMOUTHSATELLITEAllDisc Brake Caliper - FRONT LEFT1974


__________________
What a long strange trip its been


MISSISSAUGA, ONT

Status: Offline
Posts: 132
Date:
Permalink  
 

Yes, that's the one, thanks Slim!

Joe already told me that you would know this

__________________

Hannu, 1938 Dodge D8 4d sedan

http://www.flickr.com/photos/112609786@N07/sets/72157639061490723/


LINDSAY, ONT

Status: Offline
Posts: 54
Date:
Permalink  
 

any updates on this one Fella ?

__________________


MISSISSAUGA, ONT

Status: Offline
Posts: 132
Date:
Permalink  
 

Thanks for asking Derek... Not too much progress, but some

I got the front leafs finally ready and painted, also painted the front brake parts. Started with the rear leafs and found 6 leafs broken, need to add few "new" ones. Bought the new u bolts and center bolts and also some spring clamps. Also cut open the frame on the driver side and a bit more rust than I thought but not too bad job to fix No pics yet, will add later.

Went to Ancaster swap a week ago and bought the gasket set so could tear down the engine some day.

__________________

Hannu, 1938 Dodge D8 4d sedan

http://www.flickr.com/photos/112609786@N07/sets/72157639061490723/


MARKHAM, ONT

Status: Offline
Posts: 1344
Date:
Permalink  
 

Looking good Hannu.

Keep the updates coming.

__________________
PUGSY


LINDSAY, ONT

Status: Offline
Posts: 54
Date:
Permalink  
 

nice work bud keep at it

__________________


MISSISSAUGA, ONT

Status: Offline
Posts: 132
Date:
Permalink  
 

Thanks guys!

Few pics here.

Quite happy with the front springs now, need to bend the u-bolts still for these, got the u-bolts and new shackles for the rear already.

IMG_2600.JPG

IMG_2601.JPG

IMG_2610.JPG


This is the front frame rust spot in the drivers side. Didn't remove the engine yet so I needed to add some support under it.

IMG_2611.JPG

IMG_2613.JPG

IMG_2614.JPG

IMG_2615.JPG

Painted the brake calipers and disks a bit, they look a bit rough still but I think the disks will be fine after some sanding.

IMG_2618.JPG

IMG_2619.JPG


I got the rear springs sorted out as well today, Joe's warehouse had some spare leafs so have I have full set now. Cleaned them already so just waiting for some paint later this weekend I hope.


-- Edited by dodge38 on Thursday 10th of April 2014 11:58:03 PM

__________________

Hannu, 1938 Dodge D8 4d sedan

http://www.flickr.com/photos/112609786@N07/sets/72157639061490723/


BADEN, ONT

Status: Offline
Posts: 1670
Date:
Permalink  
 

Dug out the old rear fenders yesterday and took some pics. I hope they're in better shape then what you have, they need some straightening and a couple small patches.

The driver's side is the worst, but the pictures make it look worst than it is.

IMG_0477.JPG


Front edge, rolled in,

IMG_0478.JPG


Dent in the top of fender,

IMG_0479.JPG


Rear lwr portion, kinked, also hole by filler.

IMG_0480.JPG


Looking at driver's side, down the fender, (it looks worst than it is),

IMG_0481.JPG


Now the passenger side,

IMG_0482.JPG


A small rusted section was cut out, at the rear corner,

IMG_0483.JPG

Front lwr corner, also rolled in,


IMG_0484.JPG

IMG_0485.JPG

Over all, they are quite workable,

IMG_0486.JPG


By the way, Jari is just pulling your leg, when he says, to be prepared to junk them, after the meet. We did a really nice job, saving my pick up's, right fender, with the spare tire cavity last year.


__________________

Some people just simply don't get it!


MISSISSAUGA, ONT

Status: Offline
Posts: 132
Date:
Permalink  
 

Thanks for the pics Gilles!

Those definately have more original material than mine especially where connected to body. I think I could use those.

I'll send you a PM.

__________________

Hannu, 1938 Dodge D8 4d sedan

http://www.flickr.com/photos/112609786@N07/sets/72157639061490723/

1 2 3  >  Last»  | Page of 3  sorted by
 
Quick Reply

Please log in to post quick replies.


Create your own FREE Forum
Report Abuse
Powered by ActiveBoard