
| Post Info | TOPIC: Project WTF -Rat Rod Coupe- The Build! | ||||||||
|---|---|---|---|---|---|---|---|---|---|
|
ANCASTER, ONT
|
|
||||||||
|
ANCASTER, ONT
|
|
||||||||

DUNDAS, ONT
|
|
||||||||
|
ANCASTER, ONT
|
|
||||||||
|
ONTARIO
|
|
||||||||
|
ANCASTER, ONT
|
|
||||||||
|
ANCASTER, ONT
|
|
||||||||
|
NORTH BAY, ONT
|
|
||||||||
|
MARKHAM, ONT
|
|
||||||||
|
DORCHESTER, ONT
|
|
||||||||
|
ONTARIO
|
|
||||||||
|
HUNTSVILLE, ONT
|
|
||||||||
|
ANCASTER, ONT
|
|
||||||||
|
ST CATHARINES, ONT
|
|
||||||||
|
HUNTSVILLE, ONT
|
|
||||||||
|
ANCASTER, ONT
|
|
||||||||
|
CLINTON, ONT
|
|
||||||||
|
ANCASTER, ONT
|
|
||||||||
|
SOUTH RIVER, ONT
|
|
||||||||
|
BADEN, ONT
|
|
||||||||
|
S/W ONTARIO
|
|
||||||||
|
ANCASTER, ONT
|
|
||||||||
|
ANCASTER, ONT
|
|
||||||||
|
ONTARIO
|
|
||||||||
|
PORT HOPE, ONT
|
|
||||||||
|
ANCASTER, ONT
|
|
||||||||
|
ANCASTER, ONT
|
|
||||||||
|
COBBLE HILL, BC
|
|
||||||||
|
info@mancavestuff.ca
|
|
||||||||
|
ANCASTER, ONT
|
|
||||||||
|
ST CATHARINES, ONT
|
|
||||||||
|
MISSISSAUGA, ONT
|
|
||||||||
|
ANCASTER, ONT
|
|
||||||||
|
ONTARIO
|
|
||||||||
|
ANCASTER, ONT
|
|
||||||||
|
ANCASTER, ONT
|
|
||||||||
|
MISSISSAUGA, ONT
|
|
||||||||
|
ANCASTER, ONT
|
|
||||||||
|
ONTARIO
|
|
||||||||
|
BRANTFORD, ONT
|
|
||||||||
|
PORT HOPE, ONT
|
|
||||||||
|
ANCASTER, ONT
|
|
||||||||
|
ST CATHARINES, ONT
|
|
||||||||
|
DORCHESTER, ONT
|
|
||||||||
|
MILTON, ONT
|
|
||||||||
|
ANCASTER, ONT
|
|
||||||||
|
info@mancavestuff.ca
|
|
||||||||
|
ST CATHARINES, ONT
|
|
||||||||
|
ANCASTER, ONT
|
|
||||||||
|
WALKERTON, ONT
|
|
||||||||
|
|||||||||


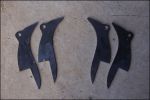
 For what it's worth, I like the shorter version!


|
|
||
