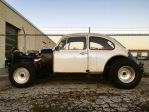
Members Login
Username 
 
Password 
    Remember Me  
Post Info TOPIC: 1971 VW Beetle


LONDON, ONT

Status: Offline
Posts: 69
Date:
1971 VW Beetle
Permalink  


I know, I know. Most of you are thinking a VW Beetle doesn't belong on a hot rod forum. Bare with me, this one is a little different.

A couple years ago I traded a project car I had sitting around for a haggard 1971 VW Super Beetle. I spent the winter of 2016/2017 building it up in my buddy's garage and cruised around in it for the summer of 2017. Over the winter of 2017/2018 I put air ride on it and got it all ready for spring 2018. Well then I went to start it up for my first cruise in the spring and as it was warming up, it spun a crank bearing. Didn't even get a chance to try the air ride!


So after looking into rebuilding or buying another engine, I was texting my buddy. He says "I got a 355 sitting here, and I need some help LS swapping my S10. Help me with that and the engine is yours." How could I say no? My original plan was going to be, find an S10 chassis, shorten it, and hide the V8 in the bug body. I've always been a fan of the open wheel, open engine, Model A and T bucket style rods, so I decided to go that route with it instead. Those are getting harder to come by and are a little out of my price range. I had an engine and I had a body. I also managed to pick up a regular cab short box S10 chassis for dirt cheap as well. I also like the idea of finding a bunch of parts that don't go together and building a car out of them. Just wanted to do something differnet and I had the opportunity to.

 nv6Hfe.jpeg


I got started on cutting the body back off the chassis (I thought it was a good idea to weld the body to the chassis the first time I built it) and cut away the bits I wasn't going to need anymore.

7q7cpS.jpg

922hMS.jpg

crr5VU.jpg

RdSxvd.jpg

Here I started laying out the the idea of how I was going to change the old fender well and make it more like a cowl.

tN3a90.jpg

Next I jumped on working on the frame. I needed shorten the wheel base by just a bit. I was avoiding cutting the center of the frame to do so. I ordered up some jeep leaf springs. They were the same width as the S10 leaf spring, but shorter. This let me move the axle 3" forward. I mede a new shackle mount and cut off the old one.

Lining up the new leaf spring to see how much I needed to take off.

UEqrrZ.jpg

Eyeing up the insert for the new shackle mount.

HCQicm.jpg

Shackle mount and bushing insert all welded in.

Gd8Zft.jpg

CdEOaG.jpg

This is how much of the rear frame was removed.

negUza.jpg

And here's the finished mount.

vEppdX.jpg

kDhGZL.jpg

kDhGZL.jpg

FQJozv.jpg

Time to take the body off the beetle chassis and set it on the S10 chassis. Lined up pretty good for just setting it on.

zwqjSa.jpg

uxo3Hq.jpg

Wcln9v.jpg

ckc8gW.jpg

Now onto the fun stuff. The beetle had a heater channel that connects the body to the chassis and those were absent on mine when I got it. That's why I just chose to weld the body to the chassis. Also the floor pans in the beetle are part of the chassis so I had to build a floor structure for the body.

Started with some sills to get the a and b pillars back together.

Y45v6V.jpg

Q6vDnr.jpg

TJ9P2Z.jpg

mjfaZc.jpg

Next I had to taper the front in to follow the taper of the body for the cowl.

kuCAv7.jpg

LlPdWf.jpg

L2qJK6.jpg

Then I started framing out my cowl.

isiZC5.jpg

vvTZ4x.jpg

Then I was onto laying out the floor structure. I laid out from the a pillar back and left the foot well section until I had the engine and trans in.

kcpzId.jpg

pMC4nT.jpg

aPLkSm.jpg

21QmoX.jpg

BLxNj7.jpg

OWa15v.jpg

Once I had the main structure laid our I got onto the new body mounts.

z8Nt15.jpg

9GnXhY.jpg

jAH8jk.jpg

With the body now mounted I added in some rails with welded in bolts for my seat mounts.

BRirYZ.jpg

Started making some rough templates for the sheet metal for my floor pans.

VfiK29.jpg

ya1AKp.jpg

I scored this 29 Chevy grill shell on kijiji for the front.

NHHjZc.jpg

Ordered a new Champion rad to keep everything cool.

Sv3wyt.jpg

Started mocking up the grill shell to get an idea of placement.

9FoVC2.jpg

h7udvb.jpg

I ended up switching from power steering to manual steering so I could push the rad back as far as possible without having to make up a whole new steering setup. I welded in a new rad support and got the rad mounted.

0SPP5G.jpg

Hg4OCk.jpg

Since the rad was done I made some headlight mounts.

WjGzVa.jpg

dvd2CG.jpg

zXCiWf.jpg

iE9sGA.jpg

Next I turned my attention to the "hood"/cowl. I wanted to hide all my wiring and battery in here so that I didn't need to do any wiring under the dash. I found these sweet locking hood pins to keep every thing locked up and secure.

pbDN4h.jpg

aMGRPA.jpg

Then I welded in the bottom.

XD9hA2.jpg

Here is was checking to make sure everything cleared for a battery.

bwp6fI.jpg

After that was done I pulled it out and made some template for body sheet metal. I was finally getting to see how everything was going to look.

YAYfAL.jpg

With the templates made I got onto sheeting in the cowl sides.

Y2xd0x.jpg

qBibiR.jpg

Next up was putting the engine and trans in. 

GtrUBI.jpg

JV3P7o.jpg

With the engine and trans in, I could finish shaping the floor and make the firewall.

KcajhF.jpg

kjAohr.jpg

LKb5Ec.jpg

ppGsvX.jpg

T8Y31s.jpg

After the firewall was in I got onto the floor pans. Did some bead rolls in the metal to stop it form oil canning and stiffen it up.

aDTxbi.jpg

2vmxDM.jpg

sWuDN3.jpg

With the floor in I got started on adding controls. 

w2W4JG.jpg

vFLQlo.jpg

H1DUt6.jpg

AvEUKz.jpg

sEYWgP.jpg

nQACBQ.jpg

A0OsYH.jpg

r0nd2v.jpg

With all that done I got my first good look of it all coming together.

3ETbfM.jpg

5QDdaI.jpg

eYKrtI.jpg

I scored a nice set of Centerlines and some big back tires and they really gave the car the look I wanted.

w7wOWF.jpg

I5bt5q.jpg

Vgit8v.jpg

I added some hood support rods and made some custom piston tail lights.

EdW3G6.jpg

BKl2SF.jpg

ZXr2Wj.jpg

I also got on cleaning up some of the body work.

KBDkhp.jpg

zEk48a.jpg

il53Qy.jpg

wda2My.jpg

bFw4MU.jpg

PsRGQK.jpg

eInD16.jpg

ZXr2Wj.jpg

Next up was wiring. Hours of wiring....hahah it really wasn't that bad. This car doesn't have too much going on.

1xlzZ2.jpg

hdF6mm.jpg

52tuxN.jpg

Next up was exhaust. My buddy had a whole trailer full of pipes that he scored and a couple Flowmaster mufflers.

BJFAOb.jpg

Ga4JMl.jpg

After that i got it all plummed. Used this aluminum water bottle for a Catch can.

ZFUNQR.jpg

I grabbed a cheap little fuel cell to get me rolling but it needed a home. I put it back where the engine used to be. Down the road I will get a bigger fuel cell but at least this one got me driving.

HgKC6C.jpg

YzJgR1.jpg

kcCRYC.jpg

w8t78s.jpg

And here's how it sits now. Still lots of finish details to work on. But at least I'm getting to cruise in it now!

6SuySY.jpg

lWjXXx.jpg


-- Edited by ratbeard86 on Monday 9th of September 2019 03:49:43 PM

__________________

Build...Break....Fix....Repeat 


ONTARIO

Status: Offline
Posts: 1450
Date:
Permalink  
 

Hey Ratbeard, ask DJD to help you out posting pics because I'm dying to see this thing. As I mentioned in another post I'm not a purist, "different" is cool to me so.....let's see it!

__________________


LONDON, ONT

Status: Offline
Posts: 69
Date:
Permalink  
 

Hey Iwannagofast,
Sorry about that. I think I got it fixed up. let me know if that work now.

__________________

Build...Break....Fix....Repeat 


ONTARIO

Status: Offline
Posts: 1450
Date:
Permalink  
 

Not yet brother.........mebbe it's my compute though, any of you other guys able to see the pics?

__________________


LONDON, ONT

Status: Offline
Posts: 69
Date:
Permalink  
 

That’s weird. It’s working on both my computer and my phone.

__________________

Build...Break....Fix....Repeat 


ONTARIO

Status: Offline
Posts: 1450
Date:
Permalink  
 

.....help...?

__________________


LONDON, ONT

Status: Offline
Posts: 69
Date:
Permalink  
 

Can you see the the attachment on this one?


Attachments
__________________

Build...Break....Fix....Repeat 


St THOMAS, ONT

Status: Offline
Posts: 720
Date:
Permalink  
 

Pics come through for me A ok. Really like that. Different is good.

__________________

If brains were wire, some couldn't short circuit a firefly.


TRENTON, ONT & SOUTH CAROLINA

Status: Offline
Posts: 521
Date:
Permalink  
 

Awsome project

__________________

If it has Tits,Tires or a Track,your gonna have a problem with it.


MILTON, ONT

Status: Offline
Posts: 960
Date:
Permalink  
 

Wow Great project

__________________

I DO WHAT THE LITTLE VOICES TELL ME TO DO.


ONTARIO

Status: Offline
Posts: 1450
Date:
Permalink  
 

Yesser, I can see that one.....MORE MORE !! very cool

__________________


MARKHAM, ONT

Status: Offline
Posts: 1342
Date:
Permalink  
 

Looks like a fun project.

And ya, I can see the pics also.

__________________
PUGSY


ONTARIO

Status: Offline
Posts: 1450
Date:
Permalink  
 

I'm a gonna shoot this computer right in the head...........

__________________


LONDON, ONT

Status: Offline
Posts: 69
Date:
Permalink  
 

Iwannagofast wrote:

I'm a gonna shoot this computer right in the head...........


 If you're still having trouble, I have everything posted on my car club FB page https://www.facebook.com/pg/wrencheadscarclub/photos/?tab=album&album_id=1386506284730626 Might be easier than re uploading all the images.


__________________

Build...Break....Fix....Repeat 


PRINCE EDWARD COUNTY, ONT

Status: Offline
Posts: 1279
Date:
Permalink  
 

Some seem to get the pictures and others not. I get them. The pictures file size may be too large and could be rejected by your service provider. Quite a common problem. Ratbeard, what size are the pictures?

Warren

__________________
You can only make it better


LONDON, ONT

Status: Offline
Posts: 69
Date:
Permalink  
 

wuga wrote:

Some seem to get the pictures and others not. I get them. The pictures file size may be too large and could be rejected by your service provider. Quite a common problem. Ratbeard, what size are the pictures?

Warren


 They are set at 960 x 720.


__________________

Build...Break....Fix....Repeat 


ONTARIO

Status: Offline
Posts: 1450
Date:
Permalink  
 

That link worked, pretty creative work!
Thanks Wuga


-- Edited by Iwannagofast on Wednesday 11th of September 2019 07:46:47 AM

__________________


PORT HOPE, ONT

Status: Offline
Posts: 2388
Date:
Permalink  
 

Wow , very cool . I enjoyed the build pics,nice work. Ed

__________________

Any day with friends doin car stuff is a good day


LONDON, ONT

Status: Offline
Posts: 69
Date:
Permalink  
 

Thanks everyone! Pretty happy with the outcome. And it’s a blast to rip around in. From here I just need to get on body and paint. Finish up the interior, and start slapping on some nicer parts. Control arms, rear ended, etc.

__________________

Build...Break....Fix....Repeat 


CLINTON, ONT

Status: Offline
Posts: 3909
Date:
Permalink  
 

That is awesome!   where do you get the energy ?    I got tired just scrolling down .      I built a 355 sbc Sunbird conv once .   wore me out lol .  that was 2001 . 


Great Job . 


__________________


LONDON, ONT

Status: Offline
Posts: 69
Date:
Permalink  
 

427CARL wrote:

That is awesome!   where do you get the energy ?    I got tired just scrolling down .      I built a 355 sbc Sunbird conv once .   wore me out lol .  that was 2001 . 


Great Job . 


 Thanks Carl! Just something I have fun doing. In the past year me and my buddies did 2 LS swaps into S10s, did an air ride Blazer with a 283, and built most of an S10 on air ride. That one is still in the works. Need to make a box for it, re-wire, and do an interior.

ts9Fz6.jpg

aLHPaI.jpg

P7nPWZ.jpg

jqUpml.jpg

We still got lots of work to do on these, but we got them running and driving.


__________________

Build...Break....Fix....Repeat 


LONDON, ONT

Status: Offline
Posts: 69
Date:
Permalink  
 

Beauty day for cruising yesterday. Grabbed a couple cool shots while we were out.

V0B67z.jpg

b47Pu7.jpg


__________________

Build...Break....Fix....Repeat 


LONDON, ONT

Status: Offline
Posts: 69
Date:
Permalink  
 

What's up everyone. Been a while since I posted. I didn't get much done over the winter this year. Did some projects that I could do in the house.

Made a couple cool pieces for the car. First was a new screwdriver key. I had seen a post where someone did this with a full size screwdriver, but I would these mini ones. That way I didn't have a giant screwdriver handle on my key ring...lol

rz5ppX.jpg

HtdEHn.jpg

I also found an old 8 ball at an antique market so I made a new shift knob.

X48j4o.jpg

 QZGRU1.jpg

8Od5A2.jpg

DQzWzw.jpg

1XSXvz.jpg

iaGxIR.jpg

I did some re-upholstery of my seats. They were looking a little too plain and I wanted to change them up a little. I saw a gasser last year that had diamond stitched door panels and I was really diggin' the look. I decided that was the route I was going to go with my interior. I got the seats all done, but didn't get a chance to get the door panels done before everything shut down.

MPcGud.jpg

9NfU3c.jpg

GgBKMX.jpg

vd2LzP.jpg

They're not perfect, but look a whole lot better than they did. I will most likely redo them, but they're good enough for now.

A big thing I wanted to get done this year was increasing my fuel capacity. I managed to do that using an old keg. This increased my fuel capacity by three times. The little 20 litre cell just wasn't cutting it. Had to plan gas stops on all my trips...lol

ucxavQ.jpg

Got a buddy of mine to tig weld all the fittings in for me. He did an awesome job!

WVNhaN.jpg

Made up some brackets to get it mounted in the car.

gdgmzA.jpg

c8Odzv.jpg

6SEhoz.jpg

bOj1hr.jpg

Because of there the filler neck was, the bug deck lid didn't open far enough to get a fuel nozzle in. I had to make the deck lid open backwards. I grabbed a couple weld on hinges and made up a bracket. The weld on hinges just slide t the side which makes the deck lid easily removable in case I have to do any work around the tank.

P9knrL.jpg

c3TBSD.jpg

hvQF7v.jpg

 xYWXe8.jpg

I used the old VW deck lid hinges. Cut them, and flipped them to use them as mounts for hood pins.

x8NErk.jpg

eBP7SF.jpg

pr28QG.jpg

4klToe.jpg

Now that we're on lock down and the weather is getting a bit nicer it was time to start cleaning up the engine bay. I had all sorts of different colours going on in there and I wanted to clean things up and make it look cohesive. I got a Hillborn style scoop that has the same fins as my Offenhauser valve covers. When it came in the paint was pretty rough. To be expected for the price I paid. I got started on repainting that and the valve covers. I wanted to stripe the fins the same colour as my interior. The cars colour are going to be black and the bright green that my seats are. used One Shot Sublime green for the accent colour.

Why8TY.jpg 

o4MnEm.jpg

EcZKFk.jpg

4ZfB5N.jpg

MG7zDy.jpg

hYwdua.jpg

mRZAKQ.jpg

erP6Xj.jpg

Things are looking much nicer now. Less like a bunch of parts slapped together and more like I actually had a plan...lol Now just to get the rest of the car looking as nice. Lots of body work to do still!


__________________

Build...Break....Fix....Repeat 


77


BARRIE, ONTARIO

Status: Offline
Posts: 1395
Date:
Permalink  
 

Cool projects

__________________

I,m as cool as Milner , but axeually a bit more like Beckwith


ONTARIO

Status: Offline
Posts: 1450
Date:
Permalink  
 

Once again I can't see the pics - and my Facebook page got hijacked by some Arabian clown, haven't been on it in a few years.

__________________


LONDON, ONT

Status: Offline
Posts: 69
Date:
Permalink  
 

When I built the car I didn't have a solid plan on what I was going to do with the speedometer. I had it hooked up when the car was still in it's original form, but once I switched to the V8 I didn't really make a plan for a GM speedometer. I've been using a GPS speedo on my phone, and it's been working fine, but I don't like the look of having a phone mounted on my windshield all the time. I picked up this GPS Speedo on Amazon last week. I pulled all the guts out of the OE VW speedo, Cut soem sheet metal to replace the glass, and mounted the GPS speedo in there.

d1k6MQ.jpg

Last night i got the bezel painted and mounted in the dash. Really diggin' how this turned out. Looks good in there.

t9aNsH.jpg


Iwannagofast I tried attaching the photos this time around as well. Let me know if this works for ya.


Attachments
__________________

Build...Break....Fix....Repeat 


ONTARIO

Status: Offline
Posts: 1450
Date:
Permalink  
 

Got -em, looking good brother

__________________


LONDON, ONT

Status: Offline
Posts: 69
Date:
Permalink  
 

Iwannagofast wrote:

Got -em, looking good brother


 Right on! Thanks!


__________________

Build...Break....Fix....Repeat 


LONDON, ONT

Status: Offline
Posts: 69
Date:
Permalink  
 

Got the bug out for some sun and fresh oil yesterday. The engine clean up was looking good in the sun! Few more things to do and start cruisin' again!

22kiot.jpg

T62c3m.jpg


Attachments
__________________

Build...Break....Fix....Repeat 


LONDON, ONT

Status: Offline
Posts: 69
Date:
Permalink  
 

Had the bug out for a rip last night. What a beauty of a night. After a carb rebuild the car is running beautifully! Now just to get the rest of it painted...haha

fnosi8.jpg

My buddy was out crusin with me in his Blazer. We're always giving each other a hard time about whose is faster. But after some tuning this year, I'm pulling away...haha

jXDJBD.jpg


Attachments
__________________

Build...Break....Fix....Repeat 


ONTARIO

Status: Offline
Posts: 1450
Date:
Permalink  
 

I'll bet she's a quick little bug ger.

__________________


LONDON, ONT

Status: Offline
Posts: 69
Date:
Permalink  
 

Iwannagofast wrote:

I'll bet she's a quick little bug ger.


 Oh yeah, she's pretty quick. Now that everything is working properly it's got some go.


__________________

Build...Break....Fix....Repeat 


LONDON, ONT

Status: Offline
Posts: 69
Date:
Permalink  
 

Repainted my flying eyeball to match the other colours on the car. The green I had it painted before just wasn't cutting it anymore. Put a little more detail into it as well. looking way better now!

S6Ufj3.jpg

mJjpLF.jpg

vpf9q3.jpg

Now I just need to get the rest of the car painted...lol


-- Edited by ratbeard86 on Monday 25th of May 2020 08:37:52 AM

Attachments
__________________

Build...Break....Fix....Repeat 


LONDON, ONT

Status: Offline
Posts: 69
Date:
Permalink  
 

Had some punk try and call me out this weekend! hahaha

RbzKye.jpg


qzAmGp.jpg


Attachments
__________________

Build...Break....Fix....Repeat 


LONDON, ONT

Status: Offline
Posts: 69
Date:
Permalink  
 

Was having a little bit of fun with Frankie last night...hahaha

https://www.facebook.com/wrencheadscarclub/videos/631162544422891

https://www.facebook.com/982179328496659/videos/1176204749404410/

You can just feel the love from my one buddy in the video....hahah


__________________

Build...Break....Fix....Repeat 


LONDON, ONT

Status: Offline
Posts: 69
Date:
Permalink  
 

Got some more interior work done this weekend. Put together a headliner and got that put in. Still need to do some stretching and pulling to get it a little tighter.

ceJZyO.jpg

I also did the back panels to match the seats. Now I just need to do the door panels and paint the interior and the interior is all done.

MmI0j8.jpg

dAXKK6.jpg

MIa532.jpg


Attachments
__________________

Build...Break....Fix....Repeat 


CLINTON, ONT

Status: Offline
Posts: 3909
Date:
Permalink  
 

Totally amazing ...love the photos. 


__________________


LONDON, ONT

Status: Offline
Posts: 69
Date:
Permalink  
 

Thanks Carl! I was actually up in your neck of the woods yesterday. Went and did the big cruise in Goderich.


__________________

Build...Break....Fix....Repeat 


LONDON, ONT

Status: Offline
Posts: 69
Date:
Permalink  
 

Drivers door panel is done. Really coming together now. It's going to be nice to finally have a full interior in this thing. Hopefully have the passenger one done in the next couple days. Then just need to paint all the metal bits and the interior is done.

7TC1Gm.jpg

u22x5h.jpg

1CRIDG.jpg

zA4Xyo.jpg

My wife and daugter also got me these rad floor mats for fathers day. Love em!

NRTECt.jpg


Attachments
__________________

Build...Break....Fix....Repeat 


ONTARIO

Status: Offline
Posts: 1450
Date:
Permalink  
 

Nice work Ratbeard, it's looking great!

__________________


LONDON, ONT

Status: Offline
Posts: 69
Date:
Permalink  
 

Iwannagofast wrote:

Nice work Ratbeard, it's looking great!


Thanks! I'm pretty pumped on it. My name's Derek. 


__________________

Build...Break....Fix....Repeat 


LONDON, ONT

Status: Offline
Posts: 69
Date:
Permalink  
 

Finished up the last door panel last night. Interior panels are all done. Now it just needs some paint.

cd8kTn.jpg


Attachments
__________________

Build...Break....Fix....Repeat 


LONDON, ONT

Status: Offline
Posts: 69
Date:
Permalink  
 

Even though I no longer own the bug, it lives on and is getting upgraded by my buddy. This this is gonna be wild when he gets it all done....haha

MI4NKD.jpg

4tjPxP.jpg 4VP0fv.jpg

NF4gIJ.jpg

bLIs9q.jpg PQPYbh.jpg


__________________

Build...Break....Fix....Repeat 


Member

Status: Offline
Posts: 37
Date:
Permalink  
 

Woah, that looks so cool. I like the choice of big tires and different wheels on this beetle.

__________________


LONDON, ONT

Status: Offline
Posts: 69
Date:
Permalink  
 

Jacob Hall wrote:

Woah, that looks so cool. I like the choice of big tires and different wheels on this beetle.


 Those are just the temporary wheels. They are a 15" wide tires, but the ones he's gonna have on thee will be 18" wide...lol There will be a matching wheel set for front and back. Skinnies up front.


__________________

Build...Break....Fix....Repeat 


Page 1 of 1  sorted by
 
Quick Reply

Please log in to post quick replies.


Create your own FREE Forum
Report Abuse
Powered by ActiveBoard