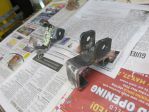
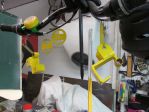
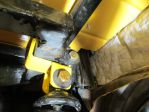
OK I will post when installed. The large open square wraps around the frame. The tube sits between the old shock mounts that are too narrow for my new shocks. The remaining 'U' shape is the new shock mount. My purpose was to use the previous shock mounts just to stabilize the new ones. The frame takes the weight and the tube holds the new mount in place.
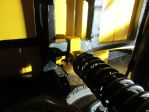
The first image shows how the square portion wraps around the frame as much as possible. The 2nd image shows how close the new shock mount is to the higher old shock mount. The old sat beside the frame, the new just below. So I think the old mount still holds this mount in position but upward forces would go into the frame and downward forces would be shared with the two bolts and both sides of the new mount. I have no way to weld under there so even if this isn't good enough, I think it will get me to a shop with a hoist so I can widen the original mount enough to accept the new shocks. Hopefully, this will work ok though and I won't need to go to a shop hoist. I have the new coilovers all set and the Permatex anti grip stuff (I forget the name), I'm jst nervous about diving in with the last step. I think I just have to lower the rear axle and slide them on. The new springs are 3" longer than the old ones. I'm hoping that will give me the extra inches I need to get over speed bumps and potholes. Just kinda nervous about the install.
What got me started was one rear coil over bolt sheared through last year and I discovered all the bolts for all the shocks are just standard. NO grade 8 bolts so I figured I better replace them all. SO I'm putting on the rear coil overs (tomorrow I guess) and replacing the mounting bolts in the front but I haven't figured out how yet. I have the front axle on jack stands and I put a bottle jack under frame at the front to try and figure how to get the weight off the shock so I can replace the bolt. Just haven't figured it out yet. But I think the rear coil overs are going to be fine. AT least I hope so. Not sure how much Permatex to slobber on but I'm looking for youtube videos. Thank you Pugsy. It's all fun.
The instructions that come with the coil overs said the warranty is void if I don't coat the shocks with Permatex to ensure the aluminum isn't damaged and the rings will turn more easily when making adjustments.
DO NOT VOID YOUR WARRANTY - Permatex anti-sieze lubricant should be used on coil over threads to prevent galling.
-- Edited by Cuddles on Wednesday 17th of May 2023 05:22:16 PM
City Welding Works is a business in town that has been around a long time and does a lot of work for the city. I don't think they do much automotive stuff but wouldn't welding in general be the same ?
If I get my car rolling, I can take it to a shop and have someone look at the welds. Today I tackle my Panhard bar in hopes I can learn how to adjust it to the right length.
Disconnect it, center the car and check the difference in length required.
Put something soft between the tire and body on both sides until the space is the same.
Thank you Pugsy. I'm guessing that I should put the coil overs on first with both adjusted to the same height, then proceed as you instructed ? Correct ?
Cuddles you have to think about how a panhard works. As the body goes up and down it (the body) moves sideways. The longer the panhard the better because of the arc. It should also be as level as posible. IMO TMJ
-- Edited by toomuchjunk on Wednesday 31st of May 2023 03:28:35 PM
TMJ
You are absolutely right about the arc. The bar should be mounted on the underside of the frame if possible and to the rearend as close to the brake drum on the opposite side to give the longest bar possible. Like a steering link, it should run parallel to the ground when at rest. An even better solution is a watts linkage but I don't think Jim has room under there. Using a tie rod with Heims joints on each end give you the best mount and adjustment.
Thank you. I learned about full bump, half travel and full droop in a youtube video about the 'sagitta'. Now I understand the how and why. I think my old springs must have kept the body at the right height for this 12" Panhard bar and with the springs removed, The body won't return to center. At least that's my reasoning. So I must remove the Panhard bar as Pugsy says and center the body. Then install the new coil overs to get the height and then measure for the length of Panhard bar needed. I hope to use the existing Panhard bar mounts since they are already there. A tie rod with Heims joints would be fun to make but an adjustable bar would be nice if I can afford one. I'll have to check prices. So much to learn. Thank you all again.